
The HP DesignJet Z9 plotter is available in POST 840 for printing posters.
The printer has a vertical and horizontal cutter, so you will not need to trim the poster. However you will need to set the correct size and settings for desired print
Semi-Gloss (Satin) / Photo Gloss: $7 per linear foot
After setting up your computer via the instructions below, you may now select the plotter as a location to print to. Before sending print jobs to the plotter, please enter the print settings and select which type of paper you wish the plot to be printed on. You will not need to change the paper when you release the job in POST 840.
Any print jobs sent to the plotter will spool to the machine in POST 840, where it will wait in a queue until it is released. To release the job for printing, identify your job in the list and check off the corresponding box in the "Print Job" column before logging in with your SOEST username and password. If entered correctly, the computer should state that your job was released successfully before the printer will begin receiving data and printing.
After printing, fill out the log on the clipboard next to the computer that details the print job.
If you notice any issues with your plot during printing, press the red X button on the printer to stop printing. This will count as a "failed" print on the log. Failed prints are billed.
If the paper or ink runs out while printing, please contact RCF in POST 820 or via email at support@soest.hawaii.edu.
From the list below, download the appropriate driver for your Windows version. Details on how to check whether your version of Windows is 32-bit or 64-bit are available here.
Note: Please attempt installation of the HPGL driver first before trying the PostScript drivers.
The download is in the form of a zip archive file, which must be extracted before being usable. Navigate to the downloaded file and right-click on it. Select "Extract All..." from the resulting menu and set the destination for the extracted contents to a location all users can access, such as C:\PrinterDrivers\z9driver
Once the driver is downloaded and extracted, follow the appropriate instructions for your Windows version to install the plotter. Select your OS version from the list below to jump ahead to the appropriate section.
Download and install software from the list below:
Procedure
"C:\WINDOWS\system32\rundll32.exe" printui.dll,PrintUIEntryDPIAware /im
xfiery.soest.hawaii.edupubsplot-xfiery.soest.hawaii.edu
Note - Folow the procedure below to delete the pubsplot-xfiery.soest.hawaii.edu port:
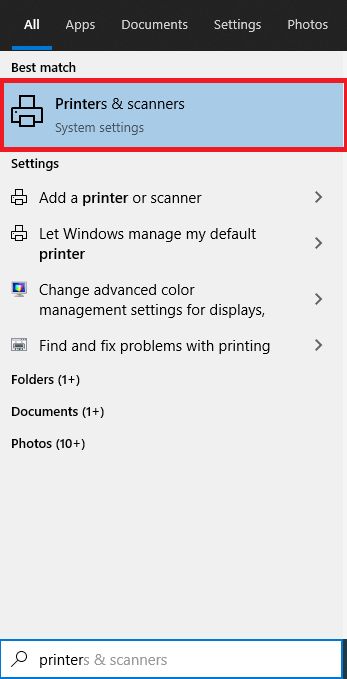
pubsplot2Press Windows button on your keyboard (or click on the search bar at left of task bar)
Windows 10 Search bar:

In search bar, type in "Printers & Scanner" and click on the result, "Printers & scanner"
Printer & Scanner:
2. Click "Add a printer or scanner"
Add a printer or scanner

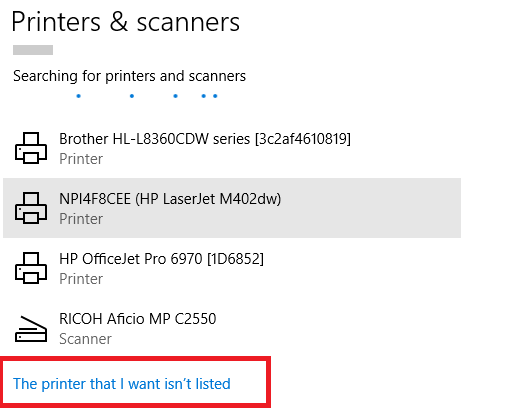
After clicking on "Add a printer or scanner", wait for Windows to load other printers.
Click the "The printer that I want isn't listed" option
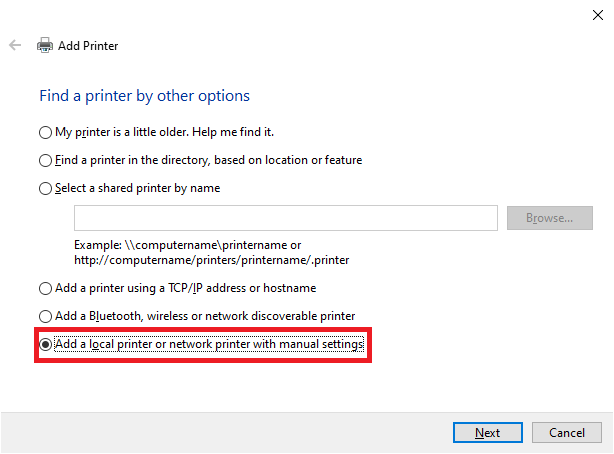
Select "Add a local printer or network printer with manual settings" and then click the "Next" button.
Select "Create a new port:", and choose "Standard TCP/IP Port" from the dropdown list. Then click the "Next" button.

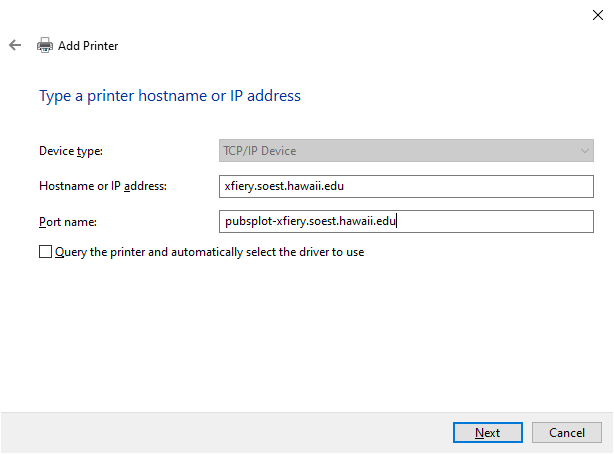
Next to "Hostname or IP address:", type "xfiery.soest.hawaii.edu".
Next to "Port name:", type "pubsplot-xfiery.soest.hawaii.edu".
Uncheck the box next to "Query the printer and automatically select the driver to use" before clicking the "Next" button.
The detecting TCP/IP port may take a long time, so please be patient.

Under Device Type, select "Custom", then click on the "Settings..." button.
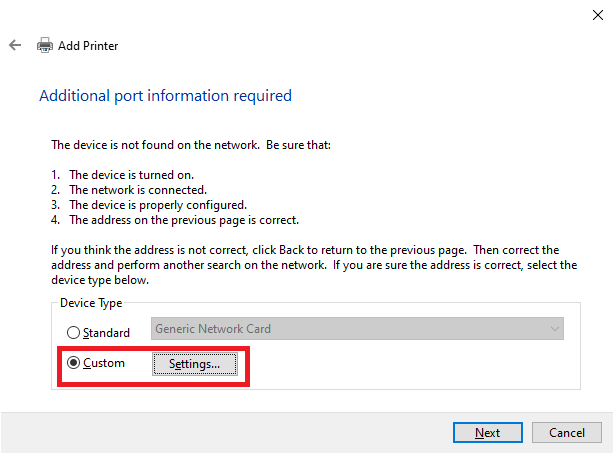
Next to "Port Name:", type "pubsplot-xfiery.soest.hawaii.edu".
Next to "Printer Name or IP Address:", type "xfiery.soest.hawaii.edu".
Under the "Protocol" section, select "LPR". The LPR settings should become available for editing. Under "LPR Settings", type "pubsplot2" next to "Queue Name:" and check the box next to "LPR Byte Counting Enabled".
Once everything above is completed, hit the "OK" button, followed by the "Next" button.

In the following section, you will direct the installation wizard to the drivers you just downloaded. Click the "Have Disk..." button.

In the resulting pop-up, click the "Browse" button and navigate to the extracted driver folder you downloaded from the driver download section.

In the folder, select "hpi2144" and then click "Open"

A list of drivers will become available. Select the "HP DesignJet Z9dr 44in V4" from the list before hitting "Next".

Enter a descriptive name to help you remember the type of plotter you are installing. This will be the name you select when choosing which printer to send a job to.

Wait for the printer to install.
Select "Do not share this printer", then click the "Next" button.

In an effort to save paper and ink, please do not print a test page. Instead, click "Finish" to complete the setup wizard.

The plotter is now installed and should appear in your list of printers.
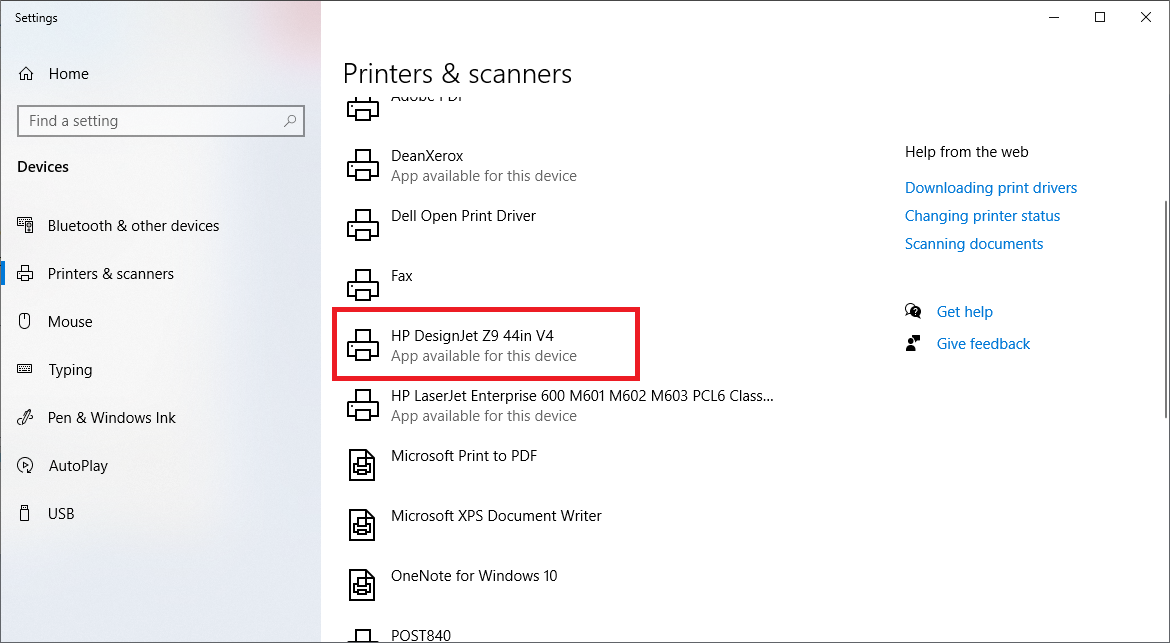
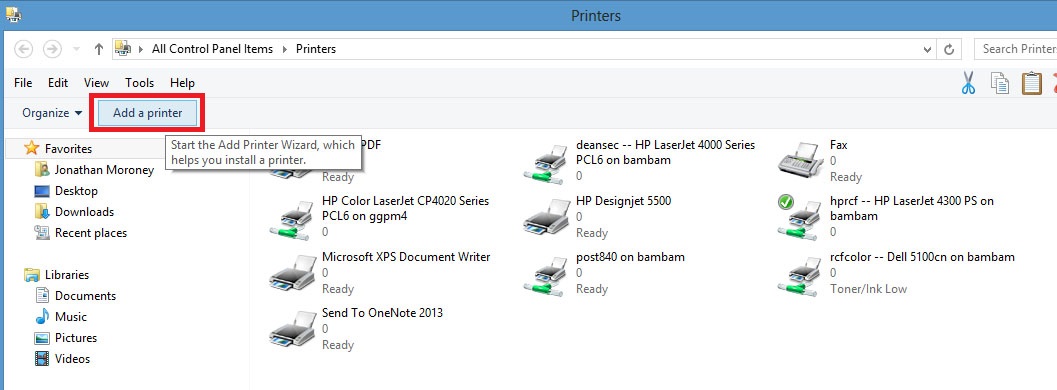
Open the Start menu and select "Devices and Printers" from the right hand side. A list of devices and printers currently installed on your machine will appear in a new window. From the top menu, click on the "Add a printer" button.
If your machine begins an automatic search for network printers, cancel the search. Otherwise, select "Add a local printer or network printer with manual settings" before clicking "Next" to continue.

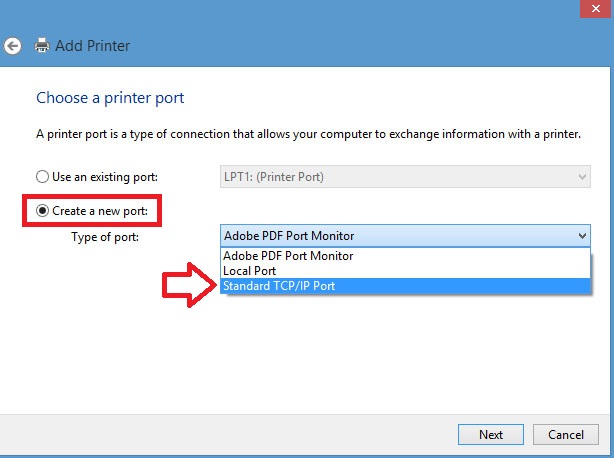
Select "Create a new port" and select "Standard TCP/IP Port" from the dropdown list next to "Type of port:". Then click "Next" to continue.
Next to "Hostname or IP address:", type "xfiery.soest.hawaii.edu".
Next to "Port name:", type "pubsplot-xfiery.soest.hawaii.edu".
Uncheck the box next to "Query the printer and automatically select the driver to use" before clicking the "Next" button.

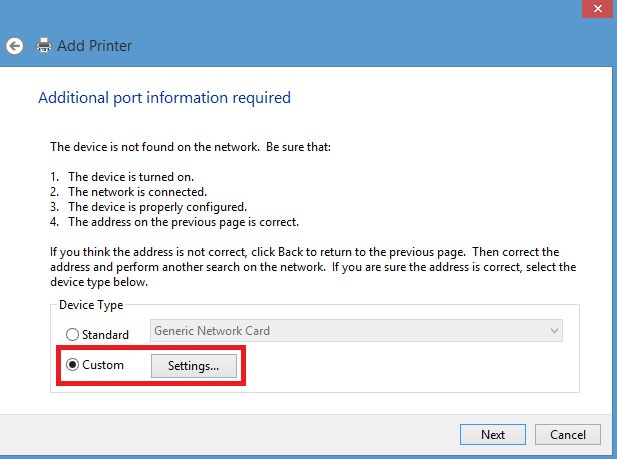
Under Device Type, select "Custom", then click on the "Settings..." button.
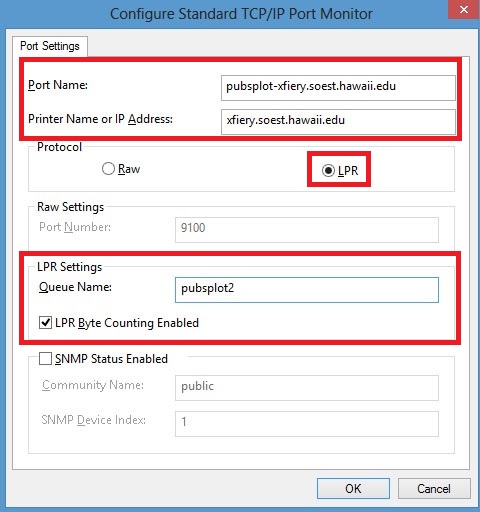
Next to "Port Name:", type "pubsplot-xfiery.soest.hawaii.edu".
Next to "Printer Name or IP Address:", type "xfiery.soest.hawaii.edu".
Under the "Protocol" section, select "LPR". The LPR settings should become available for editing. Under "LPR Settings", type "pubsplot2" next to "Queue Name:" and check the box next to "LPR Byte Counting Enabled".
Once everything above is completed, hit the "OK" button, followed by the "Next" button.
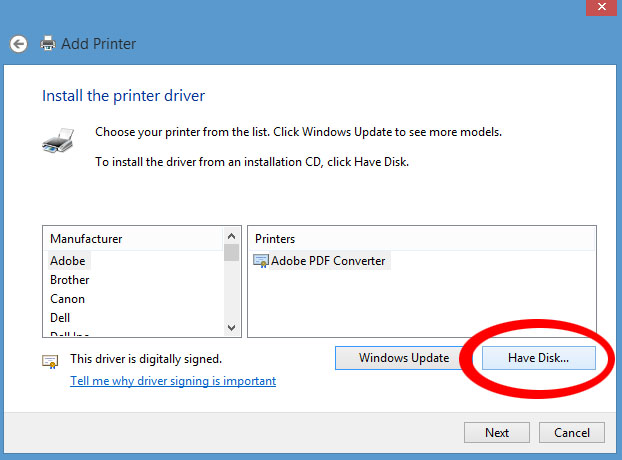
In the following section, you will direct the installation wizard to the drivers you just downloaded. Click the "Have Disk..." button.
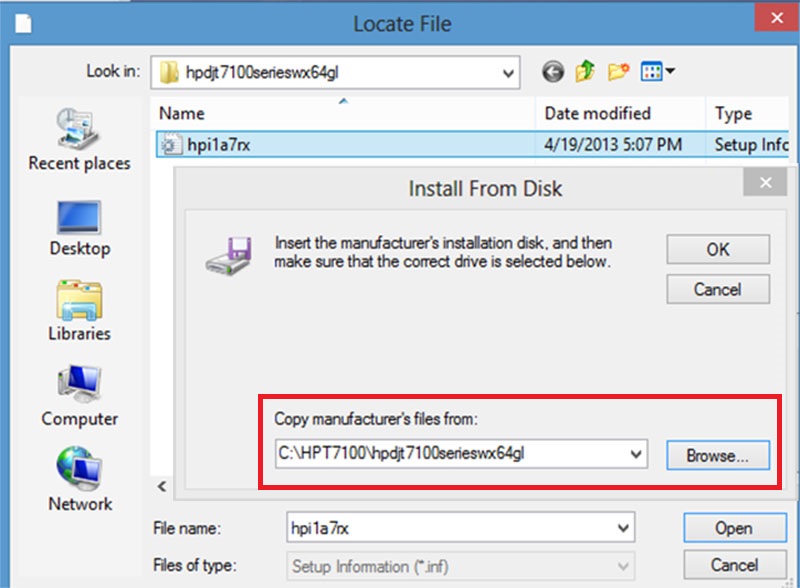
In the resulting pop-up, click the "Browse" button and navigate to the extracted driver folder you downloaded from the file you downloaded from the driver download section.
Once the correct path to the file is under "Copy manufacturer's files from:", click the "OK" button.
In the folder, select "hpi2144" and then click "Open"

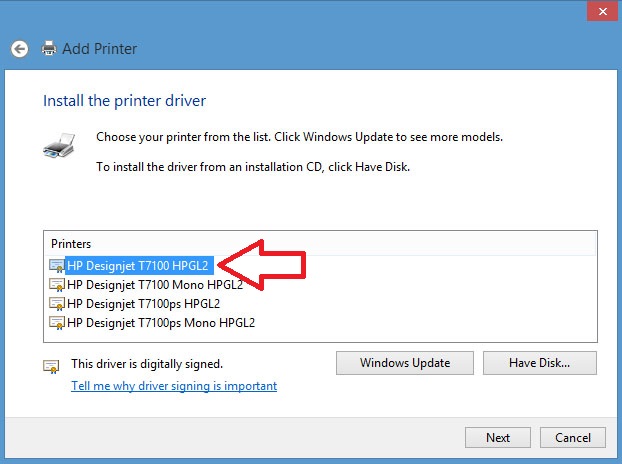
A list of drivers will become available. Select the "HP DesignJet Z9dr 44in V4" from the list before hitting "Next".
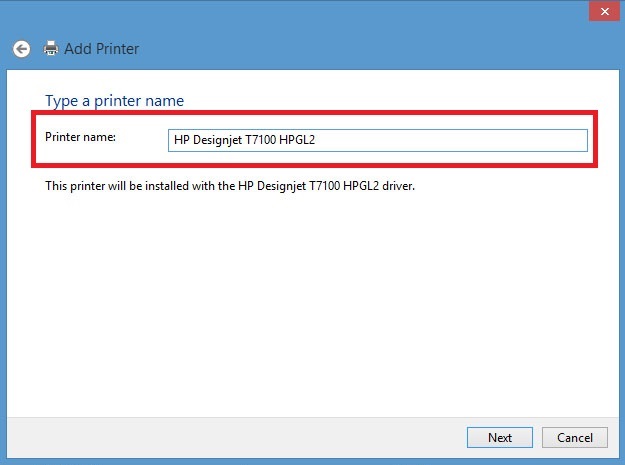
Enter a descriptive name to help you remember the type of plotter you are installing. This will be the name you select when choosing which printer to send a job to.
Wait for the printer to install. In an effort to save paper and ink, please do not print a test page. Instead, click "Finish" to complete the setup wizard.
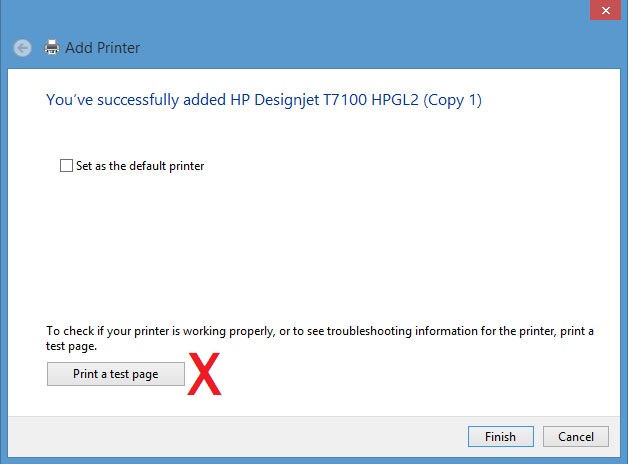
The plotter is now installed and should appear in your list of printers.
If you've encountered any problems or any error messages during the setup process, please send a detailed email to support@soest.hawaii.edu.